
Venous Access
- Draw up at least 4 cc of lidocaine
- Use ultrasound to identify your site again. Insert your needle as closes to the ultrasound probe as possible without puncturing the probe cover.
- Inject ~ 1ml lidocaine to make a wheal with a 25 gauge needle. Ensure you are always aspirating first before injecting. After the wheel, anesthetize the same path that your introducer needle will travel to puncture the vein. Try to stop about 5-10mm above the vein, and inject about 2ml of lidocaine above the vein. If you accidentally enter the vein and aspirate blood, pull the lidocaine needle back until blood can no longer be aspirated, then continue injecting lidocaine as you slowly withdraw the needle. Hold pressure for a minute if you accidentally punctured the vein.
- Use the ultrasound to relocate your puncture site, and place the vein in the center of the screen. Place the tip of your introducer needle at the base in the center of the probe gently apply pressure over your puncture site. You will see skin tenting on the US screen which will ensure your needle is properly aligned. Apply more pressure until you break through the skin. Aspirate gently once you enter the skin
- Your ultrasound probe should tracking the advancement of your needle tip.

- Pro Tip: If you lose track of the needle tip, jiggle/bounce the needle in and out lightly (without advancing), and slowly slide the US back and forth until you re-locate the needle tip.
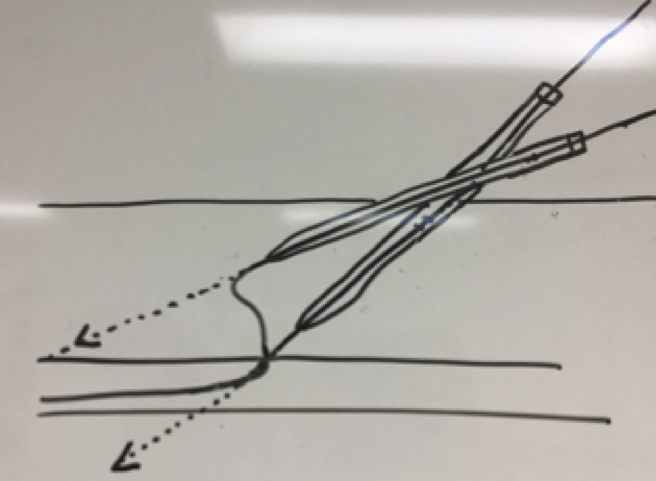
- Pro Tip: The US probe has to slide or fan forward in order to continue following the tip as the needle advances (see image). If the US probe does not move, you will end up looking the shaft of the needle instead of the needle tip. As a result, the needle tip can get deeper than intended which is a risk for pneumothorax and arterial puncture.
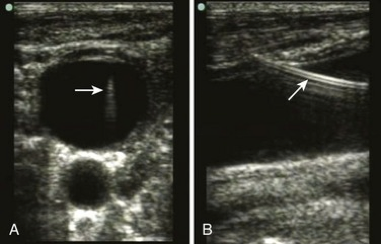
- Advance slowly until you see your needle over the top edge of the vein. The vein will start to tent.
- Pro Tip: You should almost never hub the needle unless the vein is very deep (i.e. > 4.5cm) If you have hubbed the needle you are too deep and you have a high risk of entering the thoracic cavity, causing pneumothorax, hemothorax, or arterial puncture.
- Advance a few more millimeters while aspirating until you see your needle tip enter the vein, and you are able to easily aspirate blood.
- Pro Tip: For those still learning to follow the needle tip, always pull back on the plunger while advancing the needle. You will know you have entered the vein when you feel the plunger suddenly pull back as you aspirate blood into the syringe. .
- Pro Tip: Before removing the syringe, use the ultrasound to place the needle tip in the middle of the vein. This improves the likelihood of successfully advancing the wire.
- Gently put down the ultrasound, and grab the base of your introducer needle. Rest that hand on the patient. With your dominant hand still on the syringe, gently twist the syringe to separate it from the needle.
- Pro Tip: Keep the finder needle as still as possible. The finder needle commonly gets pulled out or pushed through the back wall of the vein during this step which results inability to advance the guide wire.
- You should see slow dripping of dark blood from the open hub of the needle. Bright pulsatile blood is concerning for an arterial puncture. Lack of blood flow can be due to a low CVP or if the needle is no longer in the vein.
- Take your guide wire and thread it through the needle 20 cm. Advance gently.
- Trouble Shooting: If you meet any resistance, draw the wire back and re-attempt to advance. If the wire is stuck at 10cm the needle is most likely no longer in the vessel or the needle tip is up against the back wall of the vein. Flatten the angle of the needle a few millimeters to raise the needle tip off the back wall, and try to advance the wire. If this fails, re-attach your syringe and aspirate blood to see if the needle tip is still in the vein. If no blood is aspirated, pick up your ultrasound and reposition the needle tip in the vein.
- Trouble Shooting Tip: If the wire is stuck past 10cm, your wire is likely in the vein, but hitting a distal obstruction like the junction of the subclavian, venous stenosis, or a clot in the vessel. Slowly draw back the wire and try minute adjustments in wire position until it threads smoothly. Try directing the bevel and curvature of the J-tip wire medially or caudad to facilitate passage into the SVC rather than the ipsilateral subclavian vein.
- Pro Tip: Your assistant should watch the monitor for PVCs. If frequent PVCs pull the guide wire back 3-5cm.
Confirming Venous Insertion
- This step is extremely important prior to proceeding. Can be done in several ways:
- Always confirm dark, non-pulsatile blood is coming out of the finder needle. In hypotensive and/or hypoxic patients, arterial blood can look venous.
- Ultrasound is one of the simplest and most effective ways to confirm venous cannulation.1 Find the guide wire in the short-axis/transverse view. Slide the ultrasound to follow the wire into the vein, and continue to follow the wire to the clavicle to make sure it does not come out of the back wall of the vein into the artery. Turn the probe 90 degrees to confirm wire placement in the long axis view as well.
- Pressure measurement has been shown to be effective to prevent arterial cannulation.2 Take the small angiocatheter provided in kit and slide it over th
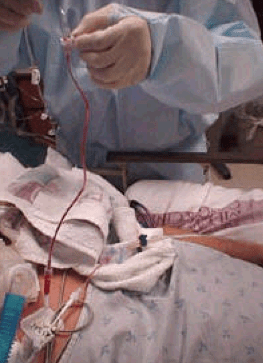 e wire. Remove the wire. Use the sterile IV extension tubing, and fill it with saline. Attach IV tubing to the angiocatheter, and hold the IV tubing vertically. If the column of saline falls down into the patient, this confirms venous placement. If arterial, the blood will be pulsatile rise up the tubing (see image).
 - Transduce a CVP with the help of the bedside nurse. This also requires placement of angiocatheter over the guidewire, and then attaching a digital transducer to the angiocatheter.
- Send a blood gas to confirm
- If you are not confident you are in the correct vessel, do not proceed! If you suspect arterial puncture, remove the guide wire, hold pressure for 10 minutes. Call for back up for a second attempt.
- If you accidentally dilated an artery, leave the dilator/catheter in place and call vascular surgery stat. The surgeons may remove the catheter in the OR in case they have to emergently perform vessel repair.

Inserting the CVC
- Slide the scalpel along the wire until the tip of the scalpel enters the skin immediately adjacent to the wire. Make a small nick about 2-3mm wide for a triple lumen or 4-5mm wide for an HD catheter or Cordis.
- Thread the dilator over the wire. Hold the shaft of the dilator close to the skin like a pencil. Advance the dilator at the same angle the introducer needle traveled. Twist the dilator slightly to decrease friction as you apply firm, constant smooth pressure to advance the dilator. Insert enough of the dilator to enter the vein, which is almost always less than half the length of the dilator. Be careful not to apply so much pressure that you kink the wire.
- Pro Tip: Continuously pull back the wire to maintain tension on the wire as the dilator is advances. This will prevent the wire from kinking. The guidewire and dilator should never be advanced as a single unit. The wire should serve as an fixed monorail over which the dilator (or catheter) slides.
- Troubleshooting Tip: If you have difficulty advancing the dilator due to poor skin turgor (aka floppy skin), have an assistant hold tension on the skin to prevent sliding of the subcutaneous tissue. Also be sure to pull back on the wire slightly as the dilator is advanced to prevent wire kinking.
- Troubleshooting Tip: If you have difficulty advancing the dilator, there may be a small uncut skin-tag between the wire and your skin nick.
- Troubleshooting Tip: If you have difficulty advancing the dilator, the wire may be kinked or the wire has been pushed out of proper alignment. With the tip of the dilator in the subcutaneous tissue, gently pull the wire out of the patient 1-2cm.
- The wire should move easily, without resistance.

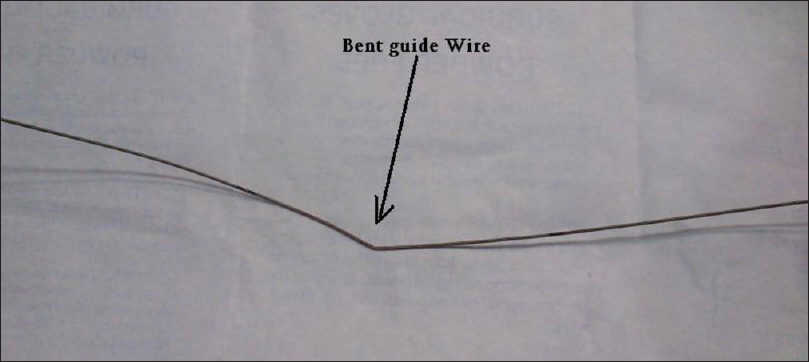
- If there is mild-moderate resistance, it suggests there is a kink, or misalignment of the wire. To correct this, pull the wire back another couple centimeters until you feel the kink of the wire pulled into the dilator (see image). This should allow you re-advance over the unbent portion of the wire.
- If the wire cannot be pulled back into the dilator, the wire may be too bent to salvage. Remove the wire and dilator from the patient for further inspection (see image).
- The wire should move easily, without resistance.
- Remove the dilator (while always keeping one hand grip on the guide wire with your other hand). Be ready to hold gauze over the insertion site as soon as the dilator is out, as the patient will bleed.
- Insert the triple lumen catheter over the wire. Unclamp the brown port as the wire will come out through this port. Once you have a hold of the wire through the brown port, slide the catheter through the skin.
- Pro Tip: You may have to pull the wire a few centimeters out of the patient in order for it come out of the end of the CVC. Failure of this step results most commonly results in the wire being lost intravascularly into the patient.
- Confirm with CXR and review personally
- Slide the catheter to desired depth (mean distances below confirmed by studies):3
- Right IJ: 15 cm
- Left IJ: 18cm
- Femoral: 20 cm
- Right subclavian: 18 cm
- Left subclavian 20 cm
- Remove the guide wire
- Use 10cc syringe filled with saline to draw back on each port until a small flash of blood appears in the syringe, then flush.
- If the central line is not hubbed, fasten the white and blue clamp together where the catheter enters the skin.
- Secure the line in at least 2-3 places (through both holes of the fasteners and through at least one hole of the line’s fastener itself if not hubbed)
- Gather all your sharps onto your bedside tray
- Remove the sterile field
- Re-scrub the catheter and skin with chlorhexidine
- Cover with sterile dressing. Consider applying adhesive glue (Mastisol) to the skin to improve adherence of the dressing.
- Dispose of all sharps in the proper container
- Confirm catheter position on CXR, and look for pneumothorax or hemothorax.
References
- Hind D, Calvert N, McWilliams R, et al: Ultrasonic locating devices for central venous cannulation: meta-analysis. BMJ 327: 361, 2003
- Bowdle A. Vascular complications of central venous catheter placement: evidence-based methods for prevention and treatment. J Cardiothorac Vasc Anesth 2014; 28:358.
- Andrews RT, Bova DA, Venbrux AC. How much guidewire is too much? Direct measurement of the distance from subclavian and internal jugular vein access sites to the superior vena cava-atrial junction during central venous catheter placement.Crit Care Med. 2000;28:138–142.
