
Ultrasound Guidance
- Routine use of ultrasound increases success, decreases the number of needle passes and decreases traumatic taps¹
- Ultrasound improves LP accuracy by
- More accurately locating the proper site of needle entry
- If the needle encounters bone, the ultrasound can be used to decide how to redirect the needle away from bone
- Consider using ultrasound for all lumbar punctures
Selecting the Site of Needle Insertion
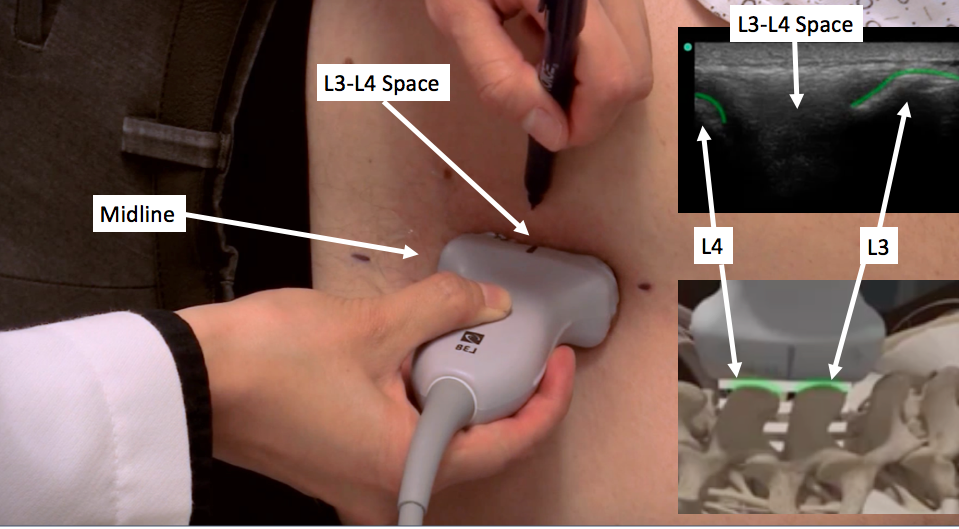
- In the transverse axis, mark the midline of the spine (see the video below for more details)
- With the linear ultrasound probe, the surface of bone appears as a bright white line with a dark shadow behind it (see the green lines in the image below)
- Slide up and down the midline to locate the L3, L4, and L5 spinous processes
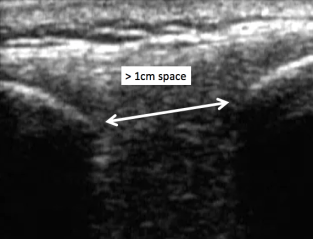
- Then rotate into the long axis view (as seen in the image below), and mark spaces between the spinous
 While in the long axis view, assess the distance between the spinous processes, and compare width between L3-L4 and L4-L5. A nice big target is considered > 1cm
- First attempt the LP in the wider of the 2 spaces
- First attempt the LP in the wider of the 2 spaces
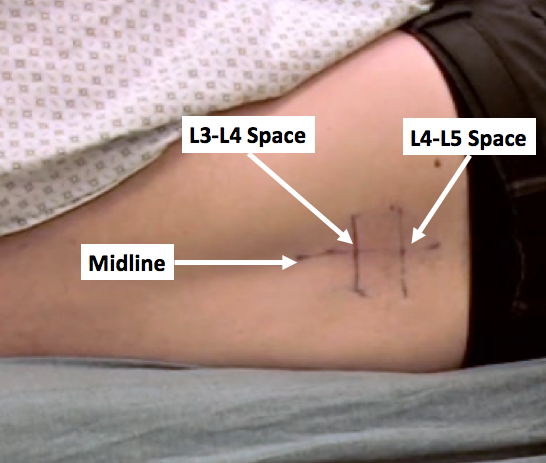
- When finished with the US, you should have marked the midline of the spine as well as 2 potential needle insertion sites between L3-L4 and L4-L5 as seen below.
 Prepare the patient and your kit. Place the probe in a sterile ultrasound cover.
- Immediately before injecting lidocaine, re-ultrasound your bony landmarks to ensure your skin markings are still aligned with the spinous processes

Troubleshooting with Ultrasound
If your needle encounters bone instead of CSF, the US can help you decide how to readjust your needle
- Leave the needle in place touching the bone
- Place the linear probe in the transverse orientation above and below the needle to verify the needle has been placed in the midline
- If the needle is not in the midline, pull the needle out, and puncture the skin at the midline
- If you are in the midline, slide the probe above and below the needle to see which spinous process is closer to the needle
- Whichever spinous process is closer to the needle. Angle away from the nearest spinous process
- To change the angle, pull the needle out into the subcutaneous tissue. Do not try to change the angle of the needle while it’s deep in the spinous ligaments. This will bend the needle.
- For more troubleshooting techniques, see the next page.
US LP Video
For a more detailed explanation, watch the video below.
US LP Tips
Obese Patients
- Sit the patients upright with their feet on a chair
- Turn the Sonosite settings from “GEN” general imaging to “PEN” penetration mode to increase the depth of ultrasound wave penetration
- If cannot the spinous processes are too deep to be seen with the linear probe then try the phased array probe or preferably a curve-linear probe to see deeper structures. Unfortunately with these low resolution probes, it becomes difficult to pinpoint the exact space between each spinous process.
- Instead of marking the space between the spinous processes, mark right on top of bony vertebral processes.
- The marking now indicate where not to insert your needle, so insert you needle in between your skin markings.
Double Check
- With a sterile probe cover on, ALWAYS use the ultrasound, and reconfirm the spinous process relation to your markings immediately prior to needle insertion
- Even small movements during setup can change the spinous process location in relation to the skin markings
Wipe off the gel
- Surgical marking pens and Sharpies immediately stop working when they come into contact with US gel
- Use a hand towel to wipe off the gel prior to marking the skin
Next Page: LP Technique
Previous Page: Kit and Supplies
References
1. Shaikh, F. et al. Ultrasound imaging for lumbar punctures and epidural catheterisations: systematic review and meta-analysis. BMJ 346, f1720 (2013).
2. Murphy, M. & Nagdev, A. Focus On: Ultrasound Guided Lumbar Puncture. ACEP News, 23-25 (2007).
3. Buhmaid, Rasha. Ultrasound Guided Lumbar Puncture. https://www.youtube.com/watch?v=DbqETxLurS0
4. Sonosite. 3D How To: Ultrasound Guided Lumbar Puncture Procedure. https://www.youtube.com/watch?v=ndnZxAcNjdg
