Discuss the frequency of complications, and how the potential benefits out weigh those risks. Assess for patient’s understanding (capacity), and probe for questions.
In emergencies when family cannot be reached, have 2 physicians sign the consent form to confirm that the benefit of the lifesaving procedure outweighs the risks
Review coagulation studies, anticoagulant and antiplatelet medications, previous vascular procedure notes, and past imaging to assess for previous vessel thrombosis.
Use ultrasound to identify the best location before setting up
Pro Tip: Look for an area where the vein is not overlying the artery. Consider the size and the depth of the vein, and compare bilaterally; the larger and more superficial the target, the easier the procedure.
Confirm you are visualizing a vein by applying pressure until both walls of the vein touch. The artery should be pulsatile and should not completely compress.
Pro Tip: Once you have identified your target, rotate the ultrasound 90 degrees to visualize the longitudinal course of the vein. Often the vein will curve in its course and this can help prevent missing your target on your first attempt.
Pro Tip: If the vein does not COMPLETELY collapse, it likely has a thrombus, and another vein should be selected
Estimate the depth of the vein from surface to guide how far you need to insert your needle. Remember, if your needle ends up deeper than the depth of the vein, you have missed the target, and need to pull back and readjust your angle of approach.
Positioning the patient
Lay the patient flat, in the Trendelenburg position for high lines. Ensure the patient is comfortable to maintain the position for at least 30 minutes.
Pro Tip: Trendelenburg increases the size of the vein for an easier target, and reduces air embolism. If the patient has a high CVP with a markedly dilated internal jugular vein (e.g. CHF, renal failure) Trendelenburg may not be necessary, nor tolerated by the patient.
Place the patient on cardiac monitor, pulse oximetry, and set the blood pressure cuff to cycle every 5 minutes.
Remove pillows and the headboard from the patient’s bed
Remove clothing, lines, etc. from the field
Pro Tip: If patient is unable to cooperate or having difficulty maintaining position, get a long towel, fold it in quarters length-wise, place it under their head, and pull the edges toward the edge of bed. Tape the ends of the towel to the edge of the bed for traction.
Position a table near the head of the bed so that materials are easily reached by the proceduralist
Put on face mask, bouffant caps and wash hands or use alcohol hand sanitizer
Use 2 Chlorapreps to scrub a large area for 30 seconds, and allow a 30 second dry time. Inform the nurse and any assisting members in the room that the field is now sterile
Perform a time out with bedside nurse
Preparing your kit
Open the kit with sterile technique onto the table
Ask the nurse for 3 blue catheter caps. Open them with sterile technique and drop them onto your open kit
Open a sterile ultrasound probe cover and drop onto your open kit
Don sterile gown and gloves
Ask the nurse to inject 20-30cc of sterile saline onto the well in the tray
Attach 2 blue caps to two of the central line ports, EXCEPT for the brown port as this is where your guide wire will emerge
Using a 10 cc syringe in the kit, draw up sterile saline and flush all three ports of your catheter. Lock the brown port while the syringe is still attached. This is to prevent air from entering your central line.
Preparing your work space
Squeeze sterile probe gel onto your field for use later
Have an assistant squeeze some ultrasound gel onto the ultrasound probe (does not need to be sterile)
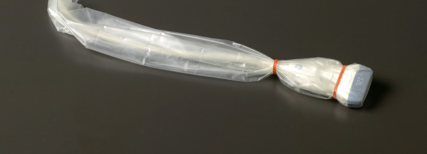
Place your hand inside the ultrasound probe cover and have your assistant hand you the ultrasound probe. Your assistant should then pull the edges of the probe cover downward until the parts of the probe that will be in the sterile field are covered.
Wrap the rubber band around the tip of the probe twice, to make it extra tight to trap all the gel at the tip of the probe.
Pro Tip: Before placing the rubber band, squeeze as much gel as possible toward the tip of the probe cover and smooth out the plastic sheath to eliminate air bubbles. Removing all air bubble from the tip of the probe will greatly increase your image quality.
Prepare your guidewire so that the curved wire tip is straighten
Place a 10 cc syringe on your finder needle
Arrange your supplies on your sterile field within easy reach in order of how you will need them:

 Open the kit with sterile technique onto the table